
Renzo Storm 5x5 Wall Tile
A backsplash we fabricate and install — see it in real kitchens below, then get your free quote.
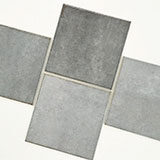
Details
- Material
- Ceramic
- Color
- storm gray
Templated, fabricated, and installed by our own crew across the northwest suburbs.
How we do backsplash installation →
Free in-home quoteAbout Renzo Storm 5x5 Wall Tile
Ceramic has been the default backsplash for a century for one reason — the glaze cleans up and the price does not scare anybody. The colour is filed as storm gray.
The numbers: 5/5 on heat, 3/5 on standing water. In a working kitchen that means it shrugs off heat and copes with standing water. Mid-greys are the forgiving middle: they hide more than white and streak less than black. Day-to-day care is soap, water and a cloth. That is the entire routine.
We set it after the countertop is in, so the reveal above the counter is right and the cuts around your outlets are not guesswork. Installed, this material benchmarks around $21/sq ft in the Chicago suburbs — the table below shows the full range and where it came from. It is one of 20 colours we stock from the Wall Tile range.
Specs
What is on the spec sheet — nothing inferred.
- Material
- Ceramic
- Collection
- Wall Tile
- Colour family
- Storm gray
- Product code
- NRENSTO5X5
In real rooms
6 rooms photographed with this surface.
These are the surface maker's room photos, not Ace jobs — they are the honest way to show a colour in daylight before you have seen a slab. We will show you ours in person, and the slab itself before we cut it.

Installed view 
Installed view 
Installed view 
Installed view 
Installed view 
Installed view
How it lives — durability & care
Independent ratings and the real maintenance routine for ceramic tile.
| Factor | Rating | What that means day to day |
|---|---|---|
| Heat | 5/5 | Fired clay is highly heat-tolerant; a glazed ceramic backsplash won't scorch behind a range. |
| Impact/chipping | 3/5 | Can chip or crack under a hard knock, and the contrasting body makes damage show. |
| Moisture | 3/5 | Body absorbs roughly 3-7% water; fine on a splash zone but not rated for freeze-thaw or constant soaking. |
| Scratch | 4/5 | Glaze runs ~6-7 Mohs and resists everyday abrasion, but a chipped glaze exposes the lighter clay body. |
| Stain | 4/5 | Glazed face is effectively non-porous and wipes clean; grout lines and any unglazed edges are the weak point. |
1–5, higher is better. Independent material ratings, not a manufacturer claim.
Care routine
- Degrease tile behind the range — Weekly · Cooking aerosolizes grease that condenses on the backsplash and slowly polymerizes into a yellow varnish. Once a week, wash the splash zone with warm water and dish soap or a diluted degreaser, then rinse. On glazed ceramic and porcelain tile a stronger alkaline degreaser is fine; on natural-stone tile stick to pH-neutral cleaner. · Avoid: Letting grease build for months — aged grease film needs harsh chemistry or scraping that grout does not appreciate · If you skip it: medium — polymerized grease stains grout lines more or less permanently and dulls the tile face
- Grout cleaning — Monthly · Scrub grout lines with a paste of baking soda and hydrogen peroxide plus a drop of dish soap, using a soft brush; rinse well. That combination lifts grease and brightens without eating the grout. Work top to bottom and re-rinse so residue does not streak the tile. · Avoid: Vinegar and other acids (dissolve cement grout over time, especially unsealed), straight bleach on colored grout (blotches the pigment), metal brushes · If you skip it: low-medium — dingy grout is cosmetic at first, but acid-cleaned grout genuinely erodes and crumbles
- Re-caulk the counter-to-backsplash joint — Yearly · The joint where the backsplash meets the countertop is a movement joint — it must be flexible caulk, not grout. Inspect it yearly: if the bead is cracked, shrunken, or peeling, cut it out and re-run kitchen-and-bath silicone or siliconized acrylic. Same for the joint around a window sill over the sink. · Avoid: Grouting a movement joint (it will crack again), caulking over the old failed bead · If you skip it: high — an open joint lets dishwater run into the wall and behind base cabinets: swollen toe-kicks, mold, and drywall repairs cost far more than a $10 tube of caulk
- Seal cement-based grout — Yearly · Cement grout is porous and drinks grease, coffee, and wine. Apply a penetrating grout sealer to clean, dry grout lines; wipe sealer off the tile faces before it hazes. Frequency honestly varies with exposure: cooking-splash zones behind a range benefit from annual sealing, while a rarely-splashed backsplash wall can go many years. Test by flicking water at the grout — if it beads, you are still protected. Epoxy grout never needs sealing. · Avoid: Sealing dirty grout (locks stains in), topical membrane-forming sealers in cooking zones (they peel) · If you skip it: medium-high — permanently stained grout lines are the top reason backsplashes get regrouted or replaced early
How it gets into your kitchen
5 steps, 2–21 days end to end.
Select and order tile
Choose tile, pattern, and grout color; confirm stock. In-stock tile ships in days; special-order tile is the usual delay and can take two weeks or more.
Tip: Order 10-15 percent overage. A broken box or a bad cut without spare tile stalls the whole job; leftover tile is also your future repair kit.
Wall prep
Remove any old backsplash, repair and prime drywall, mark outlet moves and under-cabinet lighting wiring before anything is set.
Tip: This only happens after the countertops are installed — the tile has to land on the real counter line, and slab handling would endanger finished tile.
Set tile
Tile is laid out from the counter line and set in thinset mortar. Half a day for a simple subway field; up to two days for herringbone, mosaics, or full-wall runs. Mortar cures overnight before grouting.
Tip: Ask to see the dry layout before setting starts — centering on the range, how cuts fall at corners and outlets. Ten minutes here prevents the one flaw you will stare at forever.
Grout
After the overnight mortar cure: grout, clean, and tool the joints. Half a day to a day.
Tip: Grout color changes the pattern more than tile color — confirm the swatch against your actual set tile, not the showroom board.
Caulk and seal
Flexible silicone (never grout) at the counter-to-tile joint and inside corners; sealer on natural stone tile and cement grout.
Tip: The counter joint must be caulk because the counter and wall move independently — grout there cracks within a season. Check it annually and recaulk as needed.
What it costs installed
Published benchmark ranges, so you can sanity-check any quote — including ours.
| Line item | Typical range | Unit | As of |
|---|---|---|---|
| Ceramic tile backsplash, installed | $12–$30 | per sq ft | 2025-08 |
| Regrout kitchen tile backsplash (professional) | $150–$400 | per project | 2026-07 |
| GFCI outlet added during backsplash installation | $130–$300 | per project | 2023-11 |
| Kitchen backsplash project, tile (typical 30-40 sqft) | $500–$1,500 | per project | 2025-08 |
| Professional tile backsplash installation, all materials | $30–$75 | per sq ft | 2023-09 |
| Remove existing backsplash | $3–$6 | per sq ft | 2023-11 |
| Tile backsplash installed | $15–$40 | per sq ft | 2026-07 |
| Tile backsplash installed | $15–$45 | per sq ft | 2023-11 |
Regional benchmarks for the Chicago market — not an Ace quote. Your number depends on square footage, edge, cutouts and tear-out.
Sources: Fixr, 2025; HomeGuide; BobVila.com, 2023; Inch Calculator, 2023
Pairs well with
Cabinet, hardware and wall colours that hold up next to Concrete / Cement Gray.
Cabinets
- Pure White — soft modern; keeps a small kitchen light without going all-white solid
Backsplash
- Terracotta / Clay — Concrete gray is the cold plunge terracotta needs — without it the clay goes theme-restaurant, with it the wall reads earthy and editorial. current
Steer away from
- Light Gray — Flat gray on flat gray is the 2015 flip-house special — no undertone tension, so the whole room goes dishwater the moment the light drops.
Similar surfaces
Same family — worth seeing side by side before you commit.


Questions about this surface
Can I install a tile backsplash myself?
Of the three projects, this is the most DIY-friendly: small area, no structural stakes, forgiving timeline. The skills that separate good from regrettable are layout planning around outlets and edges, straight cuts (rent a wet saw), consistent spacing, and clean grout work - and buy 10 to 15 percent extra tile for cuts and breakage. Professional labor runs roughly $5 to $20 per square foot if you decide midway that a flawless finish matters more than the savings.
Can I install my own backsplash, or should I hire a tile setter?
A straight running-bond or stacked ceramic backsplash is one of the most DIY-friendly tile jobs in a house - small format, no water exposure like a shower, and you save roughly $10-15 per square foot in labor. Hand it to a pro when the job involves glass tile (visible adhesive and cut edges), natural stone (sealing, blade chatter, breakage), herringbone or diagonal layouts (compounding alignment errors), large-format panels, or any slab product, which is fabricator work full stop. Whoever installs it, outlets are the tell: sloppy cuts around receptacles are the first thing a trained eye notices.
Ceramic or porcelain - does the difference actually matter on a backsplash?
Less than the sales pitch suggests. Porcelain’s advantages - density, near-zero water absorption, chip resistance - matter most on floors; a backsplash never gets walked on, so glazed ceramic holds up fine for decades there. Choose on looks and price, with two caveats: porcelain is the better canvas for convincing marble and brick looks, and ceramic is markedly easier to cut if you are DIYing.
Do I have to tear out the old backsplash, or can new tile go over it?
Tiling over existing tile is technically possible on a sound, flat installation, but most professionals recommend removal: doubling up adds thickness that crowds electrical outlets, window trim, and the counter joint. Removal typically costs $3 to $6 per square foot and often takes chunks of drywall with it, so expect a wall-repair line on the quote - that is normal, not padding.
Words that show up on a quote
Sixteen terms fabricators use as if everyone knows them.
- Mohs hardness
- A 1-10 mineral hardness scale used to compare countertop scratch resistance. Marble sits around 3-4 (scratches easily), granite 6-7, quartz and quartzite about 7, porcelain 7-8. A steel knife blade is roughly 5.5 — materials above that resist kitchen-knife scratches.
- Apron-front sink
- Also called a farmhouse sink: a deep bowl whose front face is exposed, replacing a strip of the cabinet front. Requires a modified, reinforced sink base - fireclay and cast iron versions commonly weigh 100-200 lb - and a countertop cut that wraps three sides of the bowl instead of a simple oval.
- Arris
- The sharp line where two surfaces of a countertop meet, such as the top and the edge face. Easing the arris means softening that line slightly so it resists chipping and feels smooth.
- Dolomitic marble
- A calcium-magnesium stone frequently sold as "soft quartzite" or under names like "super white." It looks like quartzite but etches and scratches like marble. Verify any quartzite purchase with a lemon-juice test on a sample: true quartzite will not etch.
- Edge grain
- Butcher-block construction where boards are glued with their long edges up, showing parallel strips of grain. More stable and affordable than end grain (the checkerboard of growth rings used on chopping blocks) and the standard construction for wood countertops.
- Edge profile
- The shape a fabricator grinds and polishes into the exposed front edge of a countertop - from a plain eased square to decorative curves like ogee. It affects style, chip resistance, cleaning effort, and price.
- Engineered quartz
- A factory-made slab of roughly 90% ground natural quartz mineral bound with ~10% polymer resin and pigments. Non-porous and never needs sealing, but the resin limits heat and UV tolerance. Sold under brands like Cambria, Silestone, Caesarstone, and LG Viatera.
- Etching
- A dull, slightly rough mark left when acid (lemon, vinegar, wine, some cleaners) chemically dissolves the polished surface of a calcium-based stone like marble. Etching is not a stain: sealer cannot prevent it, and removing it requires re-polishing the stone.
- Laminated edge
- An edge thickened by gluing a second strip of matching stone flat beneath the front edge, doubling the apparent slab thickness; the glue line remains visible on the edge face.
- Mitered edge
- An edge built from two stone pieces each cut at 45 degrees and epoxied so the seam hides at the corner, making thin stone read as a much thicker slab.
- Ogee
- An S-shaped decorative edge profile: a concave sweep on top flowing into a convex curve below. A classic choice for traditional and formal kitchens.
- Sink gauge
- The thickness of the steel in a stainless sink; lower numbers mean thicker metal. 16 gauge is about 0.063 in (1.59 mm) and resists dents and noise best; 18 gauge is about 0.047 in (1.2 mm) and is the value standard for residential bowls. Thinner than 18 gauge, flex and drumming become noticeable.
- Sink reveal
- The amount of sink rim left visible at an undermount cutout. A positive reveal leaves a sliver of rim showing (forgiving to fabricate, the common default); a zero or flush reveal aligns counter and bowl edges exactly (precision work that costs more); a negative reveal overhangs the bowl (sleek, but the thin lip can chip and the hidden rim traps grime). The reveal is set permanently when the countertop is cut.
- Sintered stone
- A slab made by compacting mineral powders and clays under extreme pressure and heat ("sintering") until the particles fuse — no resin binder. Heat-proof, UV-stable, and non-porous; Dekton and Neolith are the best-known brands. Often grouped with porcelain slab countertops.
- Stone sealer
- A penetrating liquid applied to porous natural stone (granite, quartzite, marble) and concrete that slows liquid absorption so spills can be wiped before they stain. Wears off with use — most stones need resealing every 6-24 months. A quick test: if water stops beading and starts darkening the stone, it is time.
- Waterfall edge
- A countertop treatment where the surface turns 90 degrees and continues down the side of an island or cabinet run to the floor, usually with mitered, book-matched corners.
Want this in your kitchen?
We supply and install Renzo Storm 5x5 Wall Tile out of our Elk Grove Village shop — templated digitally, cut to your cabinets, installed by our own crew.
Ready for a real number?
Free in-home template and an honest quote — you keep your money until there's a countertop to trade it for.